对Transformer架构进行详细解读。
论文解读
- 基础模型:MLP, CNN, RNN, Transformer.
- 这篇工作之前是针对机器翻译做的。
- RNN
- 特点:隐藏状态$h_t$是由$h_{t-1}$和第t 个词决定的。
- 缺点:
- 并行性较差。
- 对于长序列,容易丢掉较早的时序信息。(不想丢掉,可以把隐藏状态$h_t$做大,但缺点是内存开销也会随之增大)
- 与卷积相比:
- 卷积需要多层才能把距离远的像素融合起来,而transformer只需要一层。
- transformer用多头输出 模拟 多通道,学习不同模式的信息。
- 整体结构:对于输入(x1, …, xn), Encoder 输出为z = (z1, …, zn), 把 z输入Decoder, 输出为(y1, …, ym),且为逐个生成。 注意,n与 m不一定相等。
- 优点:并行计算和the shortest maximum path length。
- 编码器为自回归(auto-regressive): 之前的输出作为输入来预测下一个词。
- 注意力机制 求相识度方法:
- additive attention: 可处理query与key不等长的情况。
- dot-product attention:query与key需等长。
- 研究重点:把文字、图片、视频用transformer映射成相同的语义空间,进行多模态融合。
网络结构图

decoder模块:
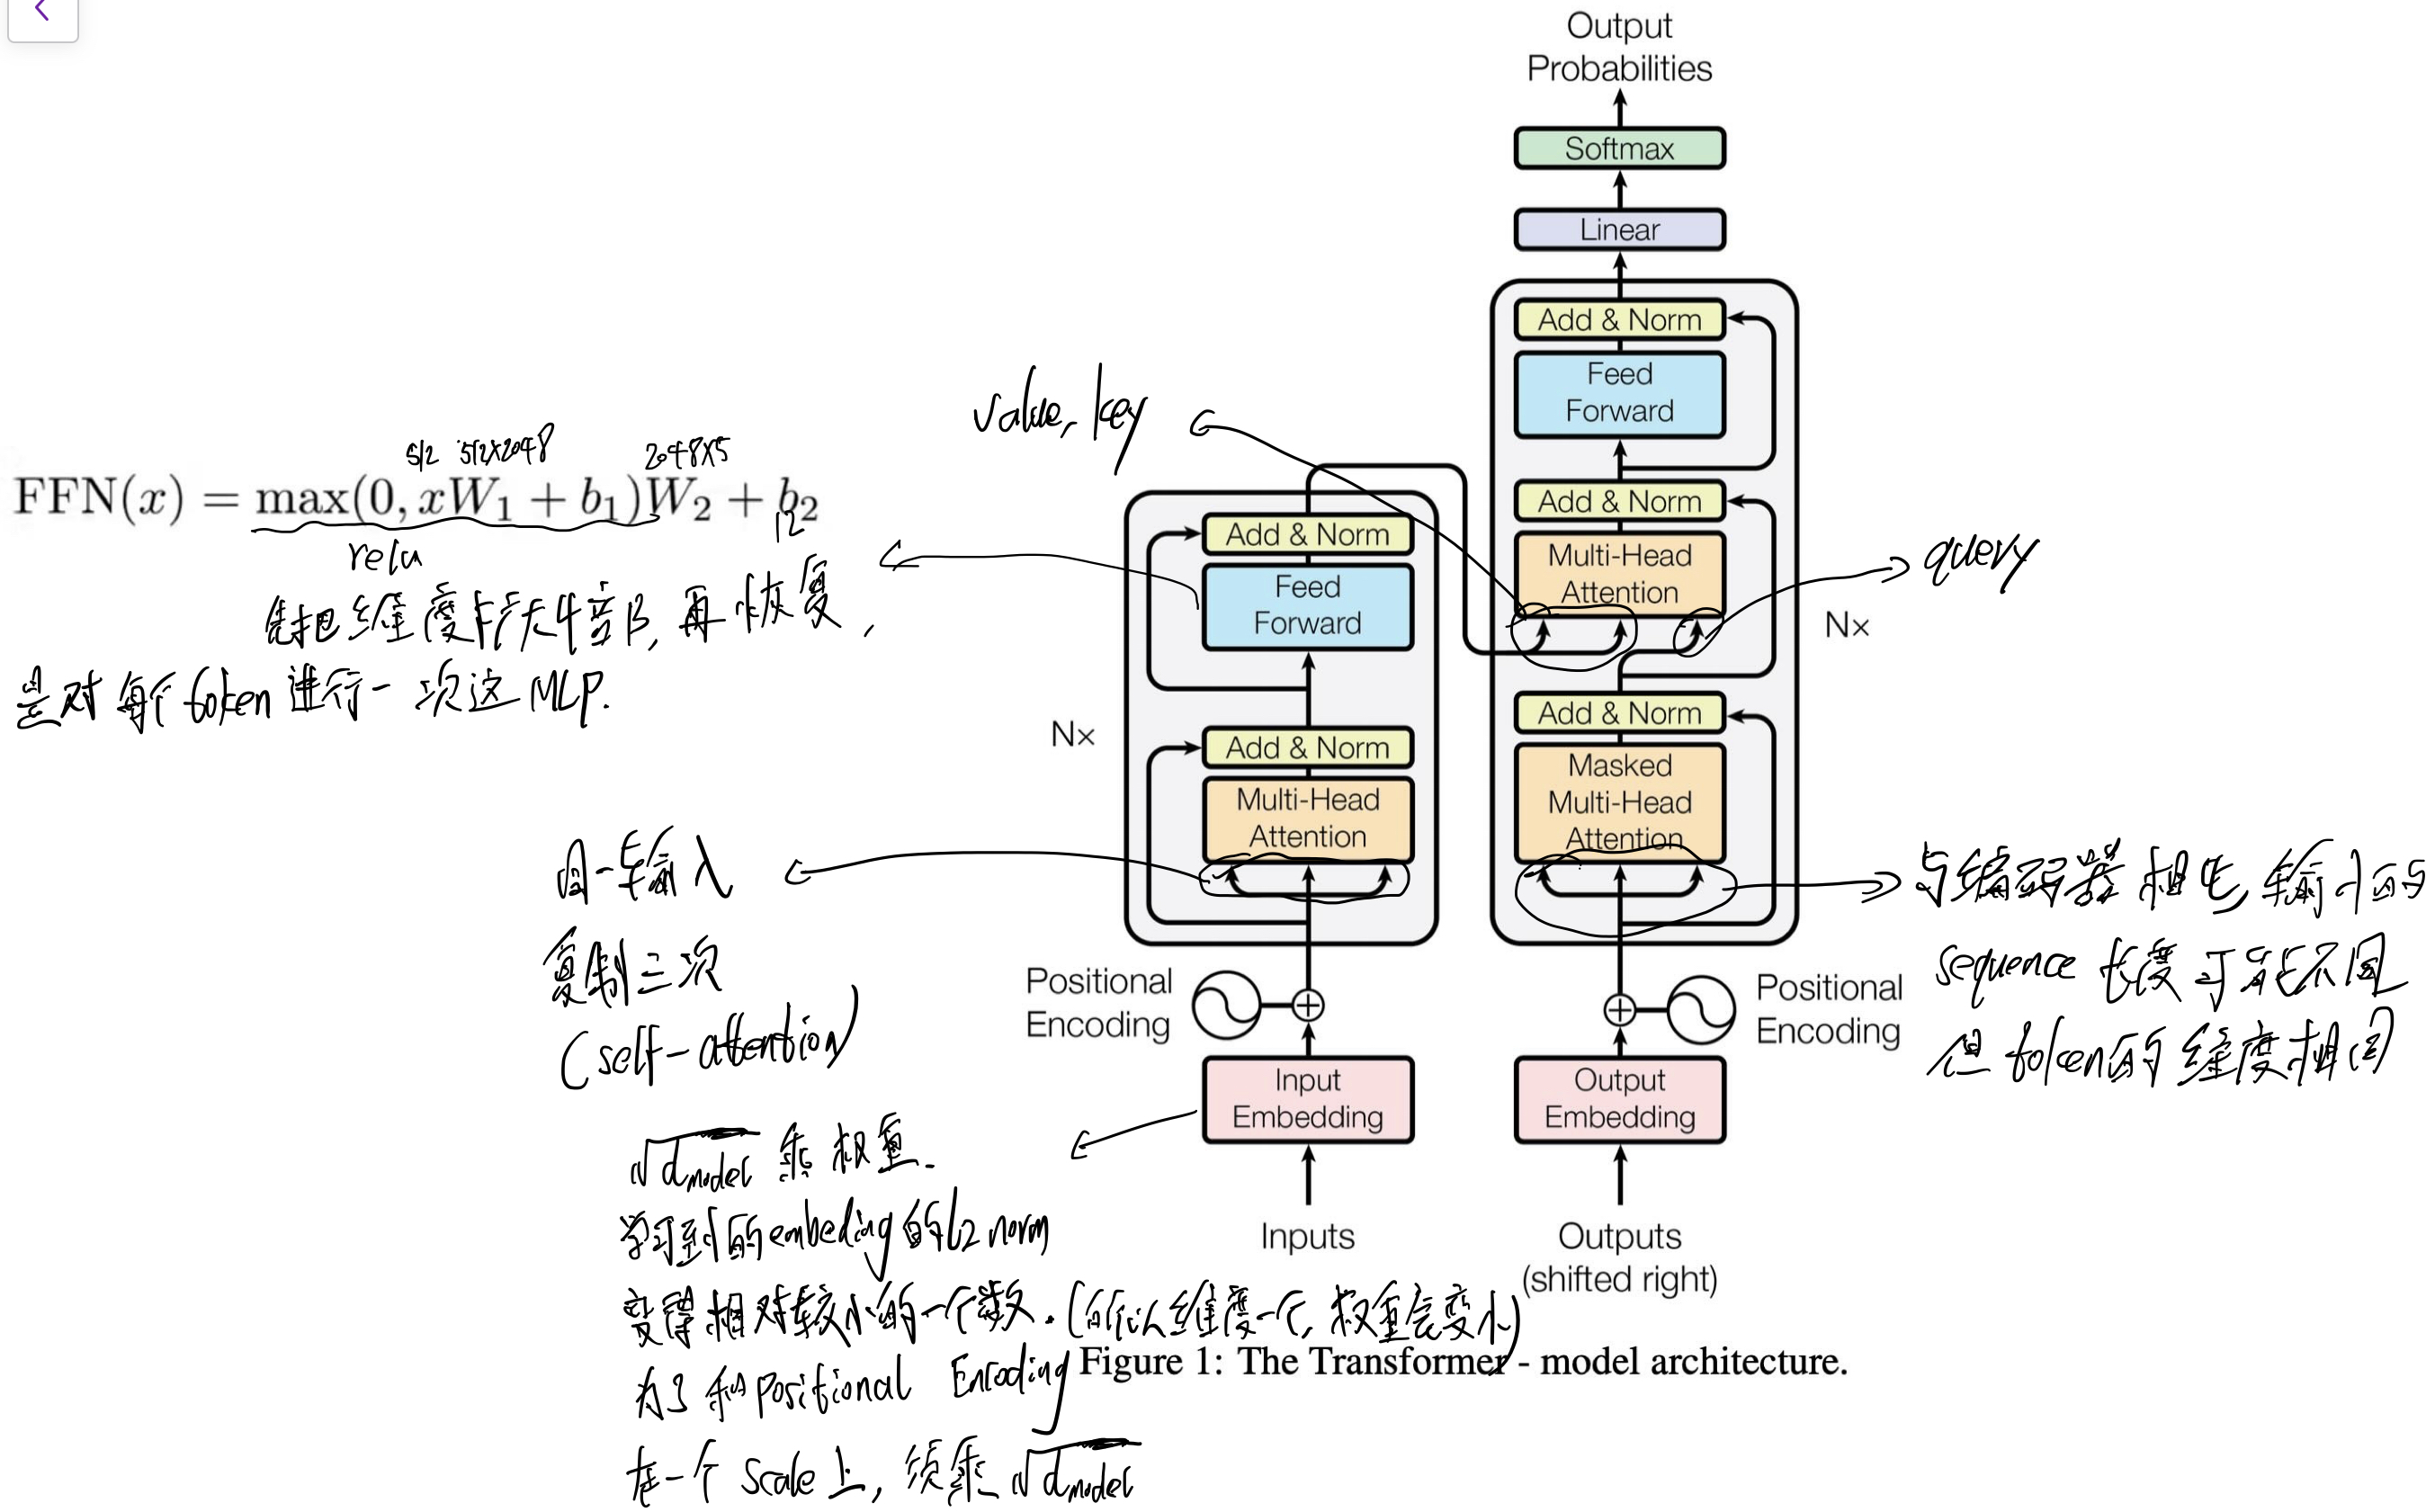
- 用了encoder中的两个子层,还在这个两个子层中加入了一个第三个子层:encoder–decoder attention。在该子层,value, key来自 encoder的输出,query来自 decoder的 self-attention层的输出。
- 对与每个子层的输出:LayerNorm(x + Sublayer(x))
- 即 用Layer norm的地方:
- encoder(2次)与decoder(3次)每次残差块相加之后。
- 这意味着 输入 x和输出Sublayer(x)的维度应一致。
- 即 用Layer norm的地方:
- Feed Forward:
- 使用drop_out(0.1)的地方(李沐动手深度学习源码)(基本对每个带权重的乘的输出,都使用了 dropout):
- 加完位置编码后的输出。
- 计算的score矩阵。
- encoder(2次)与decoder(3次)每次残差块相加之前。
- 多头自注意力机制

- Mask:
- 为了保证不会看到未来时刻的token.
- 把点乘后的Mask区域,置为非常大的负数,这样经过 softmax后 会变成 0.
- 所以 Transformer中可学习的参数为:
- Multi-Head Attention中 把高维影射为低维(原始维度/头数)的Linear。(学习到不同的投影方法,使投影后的度量空间中,可以匹配不同的模式)。
- 所以对于 Q K V, 在图上为 h=8 个小矩阵乘法,实际上分别用一个矩阵乘法即可,建议看源码。
- Concat后的 Linear.
- Feed Forward.
- Multi-Head Attention中 把高维影射为低维(原始维度/头数)的Linear。(学习到不同的投影方法,使投影后的度量空间中,可以匹配不同的模式)。
- Mask:
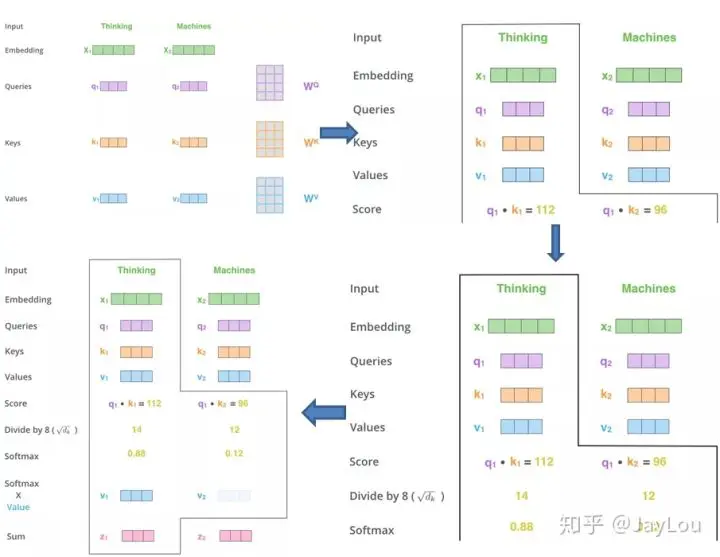
- Self Attention原理回顾:

- Bert, GPT等网络结构的构建,仅需要调整两个层:block数量、词的维度。
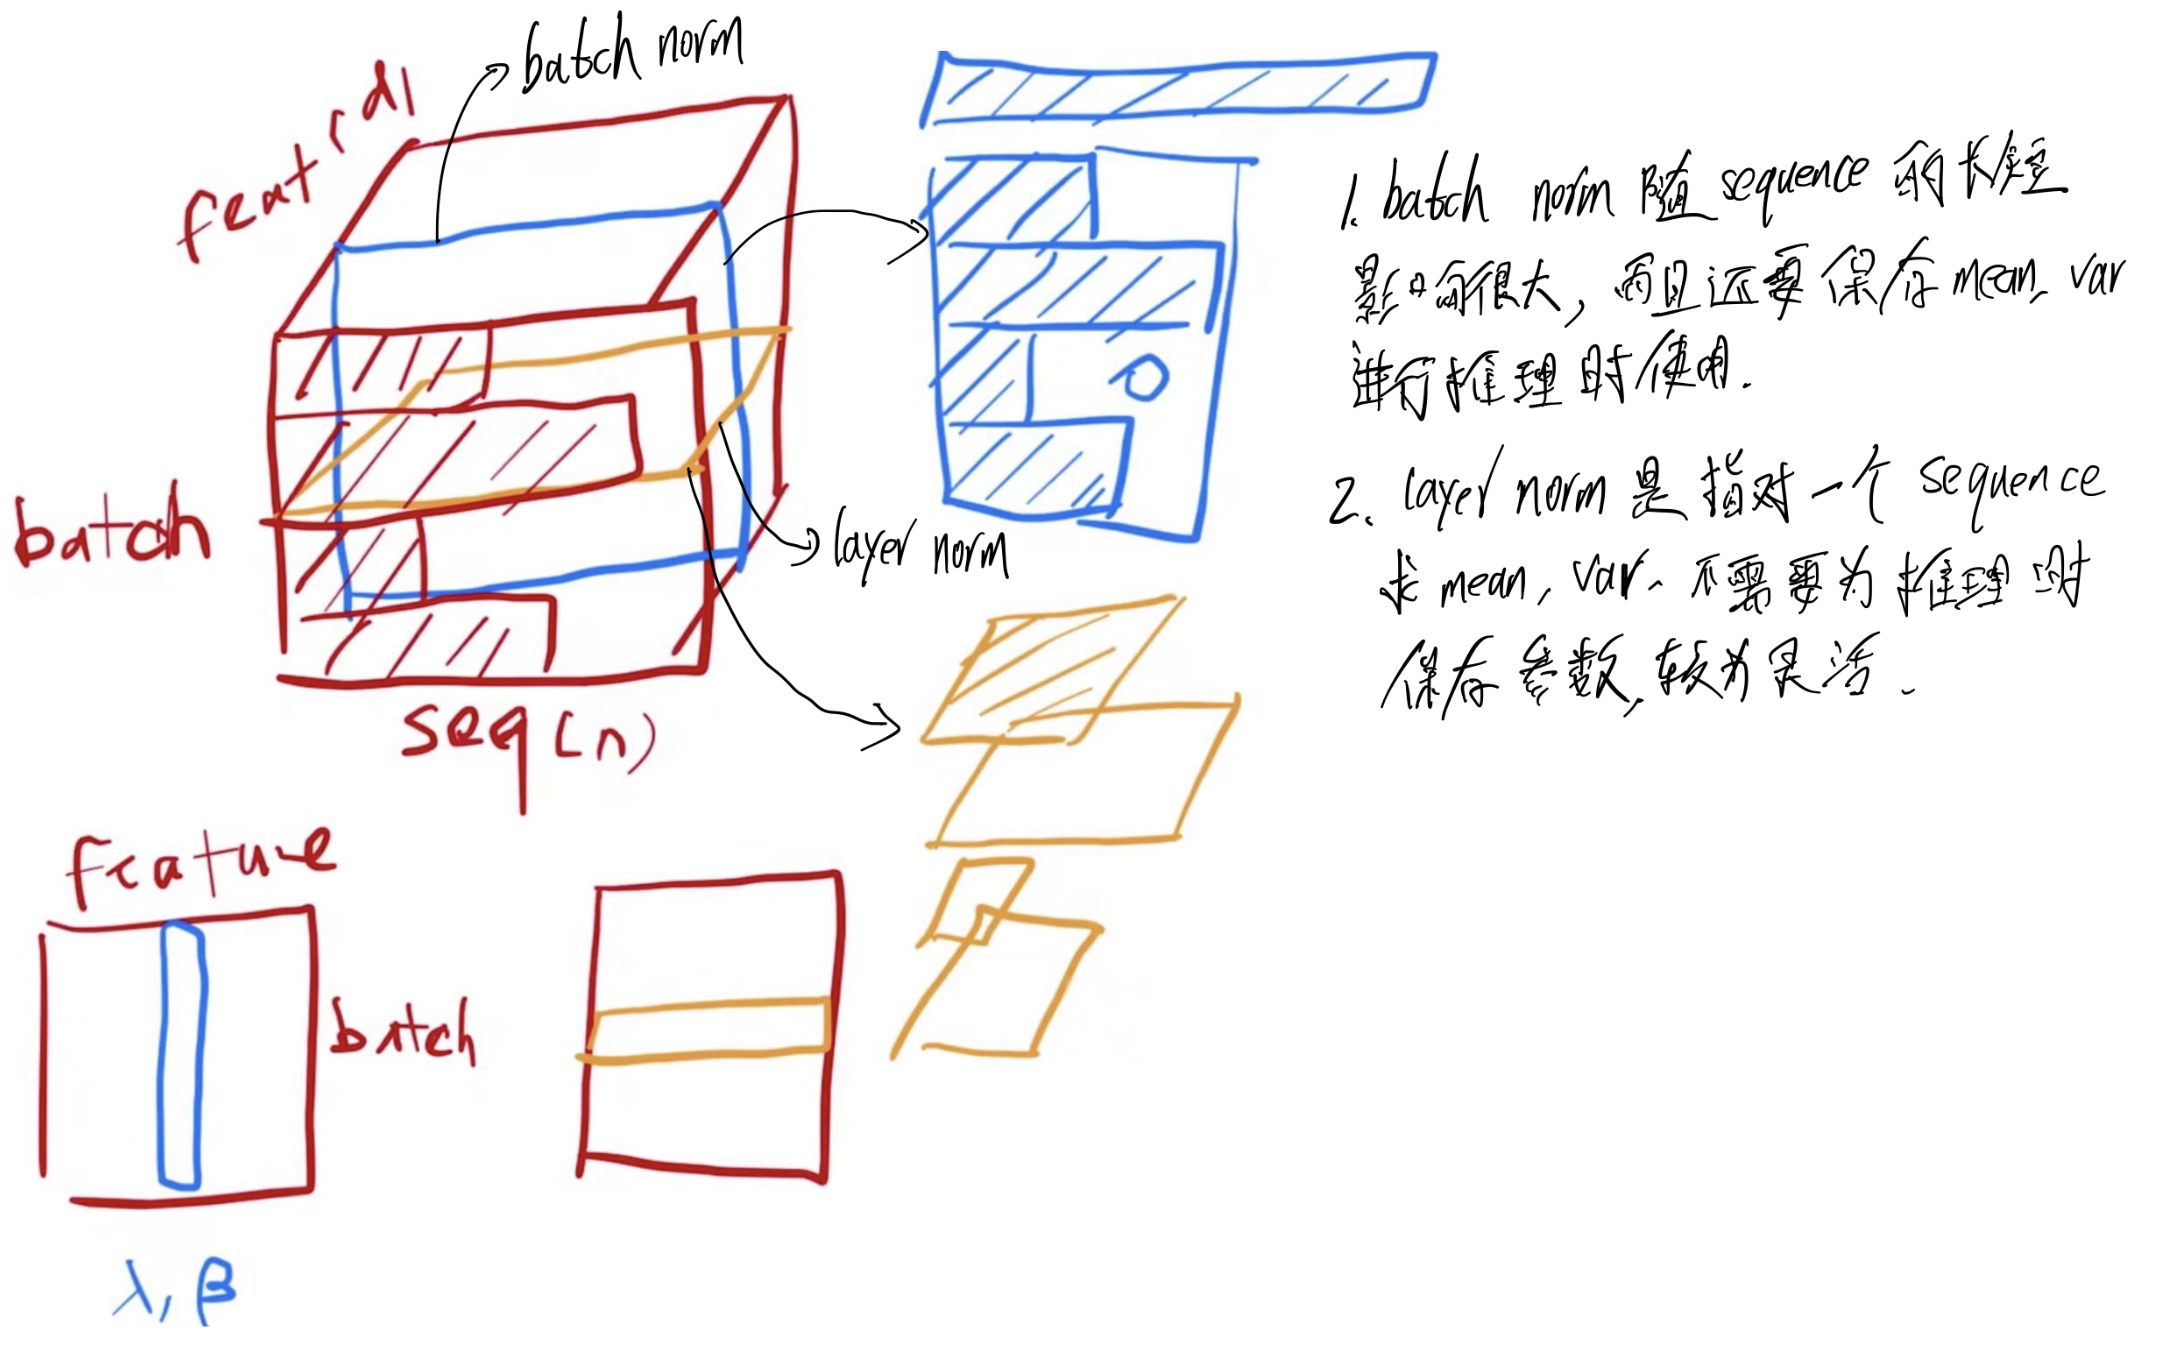
- layer norm VS batch norm:

- batch norm:
- 把一个 batch中,对每一个特征向量,减均值,除标准差,把特征维度均值变成 0,方差变成 1.
- 在训练过程中需保持均值和方差,以便在推理中使用。
- layer norm:
- 对样本维度减均值,除标准差。
- 不需要在训练过程中需保持均值和方差。
- 为什么用layer norm:
- batch norm 随 sequence的长短影响很大,而且还要保存均值、方差,进行推理是使用。
- batch norm 对于不常见的长度,之前保存均值、方差可能效果不好。
- layer norm只对一个 sequence求均值、方差,不需要在训练时保存均值、方差,较为灵活。
- batch norm:
attention矩阵表示

为什么要除以 $\sqrt{d_k}$
- 为了消除方差的影响
- 李沐:因为 如果维度比较大,点积后会得到一个很大的数,这样 不同的点积结果 相差会很大,导致softmax后的差距会比较大,计算梯度时会比较小,不利于梯度下降。
- Softmax 求梯度:Softmax求梯度的公式推导
Softmax函数是机器学习中常用的激活函数,特别是在多分类任务中。它将一个向量中的每个分量映射为0到1之间的值,并且这些值的和为1。Softmax函数的公式为:
其中,$\mathbf{z}$是输入向量,$z_i$是向量$\mathbf{z}$的第i个分量,K是向量$\mathbf{z}$的长度。
为了推导Softmax函数的梯度,我们需要计算它对输入$\mathbf{z}$的导数。具体来说,我们希望计算$\frac{\partial \sigma(\mathbf{z})_i}{\partial z_j}$。
步骤 1: Softmax的偏导数首先,记$\sigma(\mathbf{z})_i = \frac{e^{z_i}}{\sum_{k=1}^K e^{z_k}}$。
对第i个分量进行导数计算有两种情况:$i = j$和$i \neq j$。
情况 1: $i = j$当i等于j时,我们得到:
使用商的导数法则,我们有:
将公式简化,我们得到:
进一步简化为:
情况 2: $i \neq j$当i不等于j时,我们得到:
同样使用商的导数法则,我们有:
将公式简化,我们得到:
进一步简化为:
合并结果结合以上两种情况,我们可以写出Softmax函数对输入向量$\mathbf{z}$的梯度公式:
其中,$\delta_{ij}$是Kronecker delta函数,当$i=j$时,$\delta_{ij}=1$,否则$\delta_{ij}=0$。
总结一下,Softmax函数的梯度推导过程涉及对输入向量的每个分量进行求导,并且结果表示为矩阵形式,该矩阵的每个元素是上述两种情况之一。
- 梯度消失的原因:Softmax函数在输入值范围较大时会导致梯度消失,而不是梯度爆炸梯度消失的原因
当Softmax函数的输入值范围较大时,Softmax的输出值会非常极端,即某些输出值接近1,而其他输出值接近0。这会导致在计算梯度时,梯度值会非常小,从而导致梯度消失。
具体分析对于Softmax函数 $\sigma(\mathbf{z})_i = \frac{e^{z_i}}{\sum_{k} e^{z_k}}$,其梯度为:
在极端情况下:
- 当 $z_i$ 远大于其他所有 $z_k$ 时,$\sigma(z_i)$ 接近1,而$\sigma(z_j)$($j \neq i$)接近0。
- 这种情况下,$\sigma(z_i) (1 - \sigma(z_i))$ 会接近0,而 $\sigma(z_i) (-\sigma(z_j))$ 也会接近0。
因此,梯度值会非常小,导致梯度消失。
使用 $\sqrt{d_k}$ 进行缩放的原因为了避免这种梯度消失的问题,自注意力机制中对点积进行缩放:
通过除以 $\sqrt{d_k}$:
- 缩小点积的值,使得输入值不会过大,从而使得Softmax的输出值更为均匀,不至于过于极端。
- 使得Softmax输入值的方差变为1,确保输入值处于一个合理的范围内,避免梯度消失。
总结使用 $\sqrt{d_k}$ 进行缩放,主要目的是防止由于输入值范围较大导致的梯度消失问题。通过控制输入值的范围,可以确保Softmax函数的输出值更为均匀,从而避免梯度消失,确保网络的稳定训练。
所以,Softmax函数在输入值范围较大时,确实主要会导致梯度消失,而不是梯度爆炸。
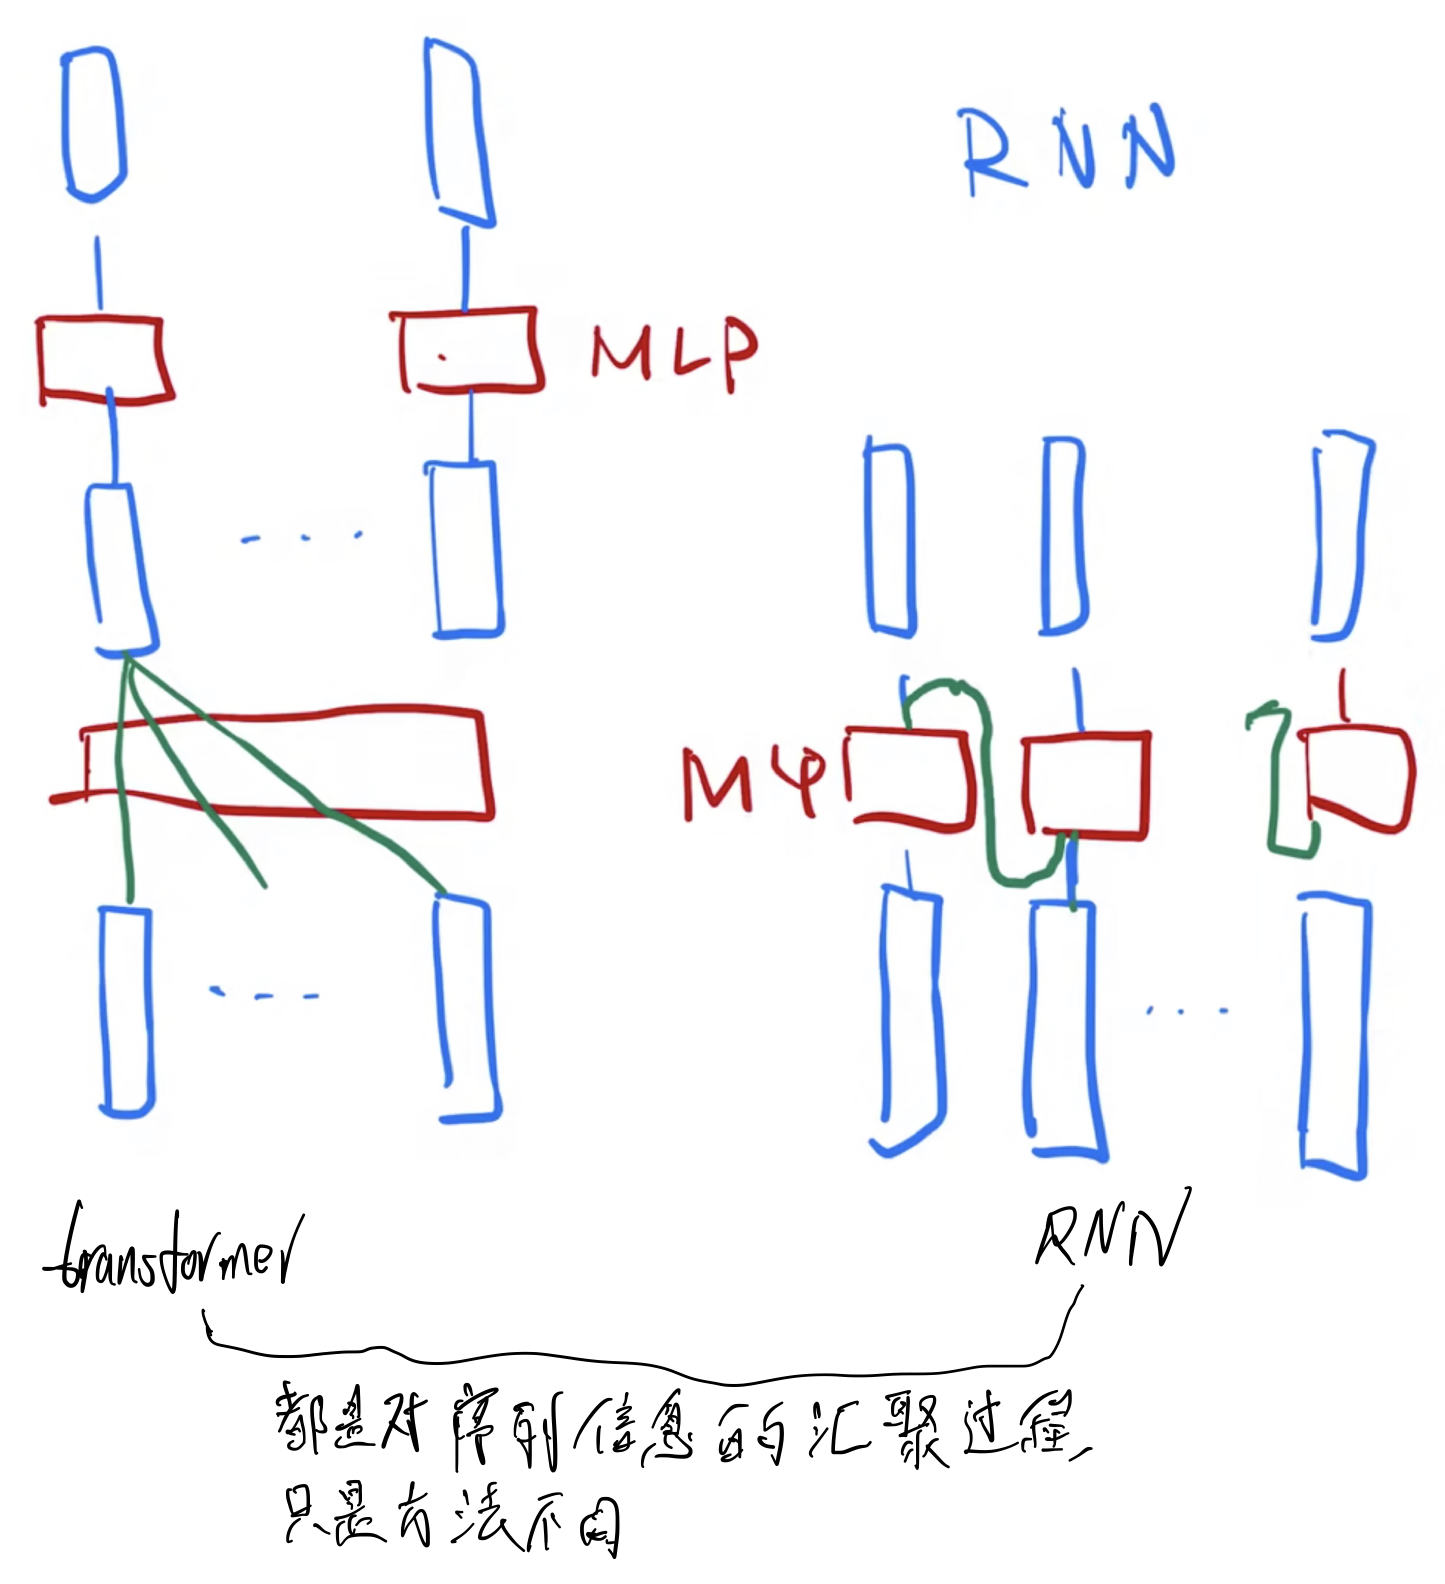
- transformer VS RNN
- Transformer:

- 上图中虽然有几个 MLP,其实只有一个。
- 因为在 self-attention时序列信息已经汇聚完成,所以对每个 Token对应的 Embedding, MLP分开做即可。
- MLP:影射到我们需要的语义空间。
- RNN:
- 也是用MLP进行语义空间的转换。
- 不一样的是如何传递序列信息:RNN是把上一个时刻的信息输出传入下一个时刻作为输入。Transformer是用 self-attention获得全局信息。关注点都是怎么有效使用序列信息。
- Transformer:
- 对比:

- 这里,一次加、乘算一个复杂度。
- d为每个 token的维度。
- Convolutional的 $d^2$ 代表通道数为 d的卷积核相乘,即shape为: $d \times k \times d$ 。
- 因为这里 attention对整个模型的假设做的跟少,导致需要更多的数据和更大的模型才能训练出和 rnn同样的效果。
- Attention不会对数据的顺序做建模,为什么会比 RNN效果好?
- Attention应用了更广泛的归纳偏置(inductive bias),使其能处理更一般化的信息。
- 所以Attention没有做空间的假设,它也会比 CNN学得更好的结果。
- 代价:它的假设更为一般了,所以它对数据中抓取信息的能力更差了。所以需要更多的数据,更大的模型才能达到原来 CNN, RNN的效果。
- 归纳偏置(inductive bias):归纳偏置(Inductive Bias)
归纳偏置(Inductive Bias)指的是一种机器学习模型在学习过程中所做的假设,这些假设帮助模型在有限的数据中学习,并在未知数据上进行预测。不同的模型具有不同的归纳偏置,它们决定了模型在不同类型的数据上表现的好坏。
Attention机制的优势在你的问题中,Attention机制比RNN和CNN表现更好,尽管它不对数据的顺序进行建模,这背后主要是因为Attention机制具有更广泛的归纳偏置。具体来说:
广泛的归纳偏置:Attention机制的设计允许它能够处理更广泛的和更一般化的信息。这意味着它没有强加于数据的一些特定的假设,比如数据的顺序或空间关系。因此,Attention机制可以在不同类型的数据上表现出色,而不仅仅是在时间序列数据或图像数据上。
没有空间假设:因为Attention机制没有像CNN那样假设局部的空间关系,它可以学到更全局的信息。这使得Attention机制在很多任务上能够比CNN取得更好的结果,特别是在需要全局上下文信息的任务中。
代价:正因为Attention机制的假设更为一般化,它需要更多的数据和更大的模型来弥补其在具体结构信息(如序列和空间信息)上的不足。因此,尽管它可以达到甚至超越RNN和CNN的效果,但需要在数据和计算资源上进行更多的投入。
总结总的来说,归纳偏置是指导机器学习模型如何处理和理解数据的关键假设。不同模型的归纳偏置不同,使得它们在不同类型的数据和任务上有不同的表现。Attention机制的广泛归纳偏置使其在很多任务上表现优异,但也需要更多的数据和更大的模型来弥补其对具体结构信息处理能力的不足。
- 总结:
- 残差连接和 Layer norm 对 Transformer 训练一个非常深的模型是很重要的。
- Positionwise feed-forward network 对序列中所有位置的影射是一样的,即用了同样的 MLP.
- Transformer是一种 encoder-decoder架构,在实际应用中,可以单独用它的 encoder或 decoder.
- 问题:
- PositionalEncoding
- self.training 如何控制 dropout
- 如何处理数据
Code
PositionWiseFFN(nn.Module)
1 | class PositionWiseFFN(nn.Module): #@save |
这是 block中的第子层 FFP,因为每个位置都进行同样的该操作,所以叫做positionwise feed-forward network 。
这里 LazyLinear表示在根据输入的 shape进行初始化权重(权重 shape及参数初始化).
nn.LayerNorm
1 | ln = nn.LayerNorm(2) # 定义LayerNorm都需要指定 shape |
这里对比了 batch norm 与 layer norm.
batch norm主要是为了防止随着深度的增加,输出的数值不稳定性(经过累乘会变大),加速模型训练;同时也引入了噪声,也有正则化的作用。
layer norm也有相似的作用,只是从batch norm以特征维度 改成 以样本维度。这在输入长短不一时尤其有效。
AddNorm
1 | class AddNorm(nn.Module): #@save |
这里定义了残差块最后 原始输入和输出相加的过程。
注意流程为:dropout-> add -> layer norm
MultiHeadAttention
1 | class MultiHeadAttention(d2l.Module): |
这里transpose_qkv先把原始输入:
- (batch_size, sequence_nums, tensor_dim)torch.Size([128, 9, 256]) —-(
X = X.reshape(X.shape[0], X.shape[1], self.num_heads, -1))—-> - (batch_size, sequence_nums, heads_nums, tensor_dim//heads_nums) torch.Size([128, 9, 4, 64]) —-(
X = X.permute(0, 2, 1, 3))—-> - (batch_size, heads_nums, sequence_nums, tensor_dim//heads_nums) torch.Size([128, 4, 9, 64]) —-(
return X.reshape(-1, X.shape[2], X.shape[3]))—-> - (batch_size$*$heads_nums, sequence_nums, tensor_dim//heads_nums) torch.Size([512, 9, 64])
这里self.attention为下面的:
self.attention
1 | class DotProductAttention(nn.Module): |
torch.bmm是在批次中进行矩阵乘法,即:
torch.bmm(X Y)
import torch
X = torch.arange(8).reshape((2, 1, 4))
Y = torch.arange(24).reshape((2, 4, 3))
print(X, Y, sep='\n')
torch.bmm(X, Y), torch.bmm(X, Y).shape
# output:
# tensor([[[0, 1, 2, 3]],

#         [[4, 5, 6, 7]]])
# tensor([[[ 0,  1,  2],
#          [ 3,  4,  5],
#          [ 6,  7,  8],
#          [ 9, 10, 11]],

#         [[12, 13, 14],
#          [15, 16, 17],
#          [18, 19, 20],
#          [21, 22, 23]]])
# tensor([[[ 42,  48,  54]],

# [[378, 400, 422]]]) torch.Size([2, 1, 3])这里scores = torch.bmm(queries, keys.transpose(1, 2)) / math.sqrt(d)的维度变化:
- queries: torch.Size([512, 9, 64])
- keys.transpose(1, 2): torch.Size([512, 64, 9])
- scores: torch.Size([512, 9, 9])
好的,下面是用中文解释并证明图片中公式的markdown格式:
证明矩阵乘法公式:
设:
- 行向量 $\mathbf{x} = [x_1, x_2, \ldots, x_n]$
- 矩阵
要证明公式:
证明过程
首先计算行向量 $\mathbf{x}$ 与矩阵 $\mathbf{Y}$ 的乘积:
结果是一个行向量 $\mathbf{z}$,其每个元素 $z_i$ 是 $\mathbf{x}$ 中对应元素与 $\mathbf{Y}$ 列向量的乘积之和:
因此,结果向量 $\mathbf{z}$ 可以表示为:
其中:
这可以重新解释为 $\mathbf{Y}$ 的列向量的线性组合,其中每个列向量由 $\mathbf{x}$ 中对应的元素加权:
因此,图片中的公式是正确的,可以通过显式执行矩阵乘法并认识到结果向量是矩阵 $\mathbf{Y}$ 的列向量的线性组合来证明。
masked_softmax(X, valid_lens)
1 | def masked_softmax(X, valid_lens): |
这里-1e6=-1000000.0
这里对于decoder, mask 为:1
2
3
4
5
6
7tensor([[ True, False, False, ..., False, False, False],
[ True, True, False, ..., False, False, False],
[ True, True, True, ..., False, False, False],
...,
[ True, True, True, ..., True, False, False],
[ True, True, True, ..., True, True, False],
[ True, True, True, ..., True, True, True]])
1 | if os.path.exists(fname) and sha1_hash: |
检验文件的哈希值是否与给定的哈希值一样。
1 | def extract(filename, folder=None): |
对压缩包进行抽取